


Personalizing Emails in Marketing Cloud
Let your constituents know that they are important and recognized by using personalization with profile attributes in your email.
REQUIRED The data you want to include as personalization, including preferred name, MUST exist as a column in your Salesforce Report (note that you'll only be able to see preferred name fields as a selection option in reporting; the data will not be visible on the contact record). If you are sending to a Data Extension, the Data Extension MUST be configured to include the data you are using to personalize as well. Please work with your eComm specialist to ensure that your reports and data extensions are correctly configured for personalization, and don't forget to test.
Marketing Cloud Personalization Attributes
Commonly referred to as data tags, Marketing Cloud attributes allow you to personalize your communication for your constituents. If you wish to add personalization for data that already exists in Salesforce, it's less involved than adding data outside of Salesforce (such as a unique survey link). In this example, we'll focus on the simpler and most popular option - adding a preferred name to your communication.
UNDERSTANDING PREFERRED NAME AT CU While the instructions below will help you successfully personalize your email using preferred name, we recommend reviewing the wiki Understanding Preferred Name at CU to ensure that you're aware of the intricacies of the data.
Step 1: Add the profile attribute to your email
REQUIRED The data you want to include as personalization, including preferred name, MUST exist as a column in your Salesforce Report (note that you'll only be able to see preferred name fields as a selection option in reporting; the data will not be visible on the contact record). If you are sending to a Data Extension, the Data Extension MUST be configured to include the data you are using to personalize as well.
To add the desired preferred name as a profile attribute, log into Marketing Cloud, navigate to Email Studio, and open the email to which you want to add the attribute. Open the content block to which you want to add personalization, and click where you want the attribute to appear.
Locate the person/silhouette icon from the menu items above your content, and click the dropdown arrow. Here you'll see you available Profile Attributes from which to choose:
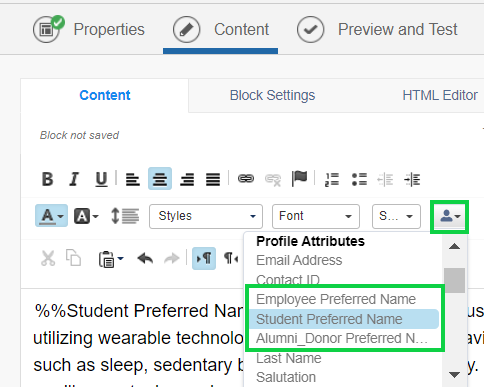
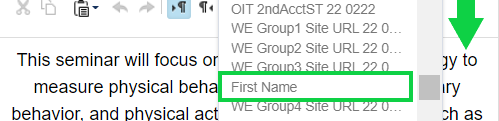
Select the Profile Attribute you wish to use for personalization. Marketing Cloud will add the first name profile attribute to your content with %% before and after, like:
- %%Alumni_Donor Preferred Name%%
Be sure to format the attribute and include any needed punctuation after.
NOTE You can also add personalization to the subject line and preheader by using the silhouette icon that appears when you're editing that text.
STEP 2: Test and preview the personalization
Don't forget to test and preview your personalization. The few minutes you spend ensuring that your reports and data extensions contain the correct data will be invaluable in ensuring the success of your personalization.