Monthly License Change Requests
This resource is designed for eComm specialists who are responsible for submitting provisioning and deprovisioning requests for their campus. Learn how to submit requests while being mindful of important deadlines and details that affect the user experience.
No Exceptions Exceptions to the following process and timelines CANNOT be accommodated for any reason.
Checkboxes are not visible in Dashboard Lightning Table widget Checkbox Values are not displayed in the Lightning table widget in Dashboards since the Winter '25 release. While this is a known issue currently in review, there is no resolution timeframe. Until then, please use the workaround outlined below in the 'View License Details' section.
Provisioning Requests
eComm specialists submit provisioning requests throughout the month. The System team addresses these requests in a single batch during the first week of each month. New users MUST complete pre-access requirements before they will be provisioned, including:
- Relevant SkillSoft courses (confirmed via file uploads to the user's license record), and
- A signed user agreement (both the user and their supervisor must sign the agreement)
How to submit a provisioning request
Review Contact
Before submitting a request, it's important to confirm that you're provisioning the correct person based on their employment with CU. To do so, view the Contact record along with the Related tab.
- Does their university email populate in a university email field? For example, a CU Boulder employee should have a UCB Email populated.
- Do they have an employee ID?
- Do they have an active CU Employment record?*
*People of Interest (POI) POIs are a temporary type of university employee whose data displays in Salesforce differently compared to a typical employee. POIs will not have an Employment record in Salesforce, but it's important to confirm 1) that an Employee ID is populated, and 2) that their university email displayed in the respective university email field in Salesforce. The eComm specialist or POI may need to work with their campus OIT team to get their email address populated in Salesforce. Inactive POIs or those missing a university email in Salesforce CANNOT be provisioned.
Don't have access? eComm specialists must review this following wiki and pass the quiz for access.
Submit Request
- Scroll to the bottom of the Contact to the Provisioning field and click on "Click Here to Provision or Deprovision"

- Choose Provision and select Next

- Review details of current access (if relevant) and select Next.

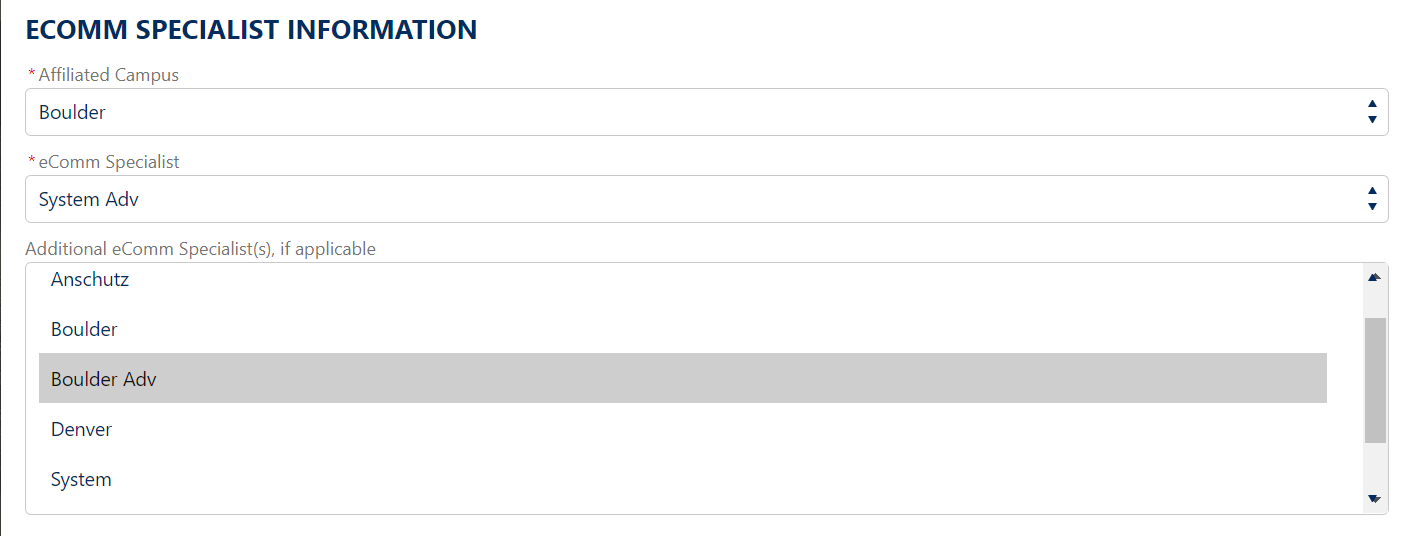
- Populate eComm specialist information:
- Affiliated Campus
- eComm Specialist
- Additional eComm Specialists (if applicable)
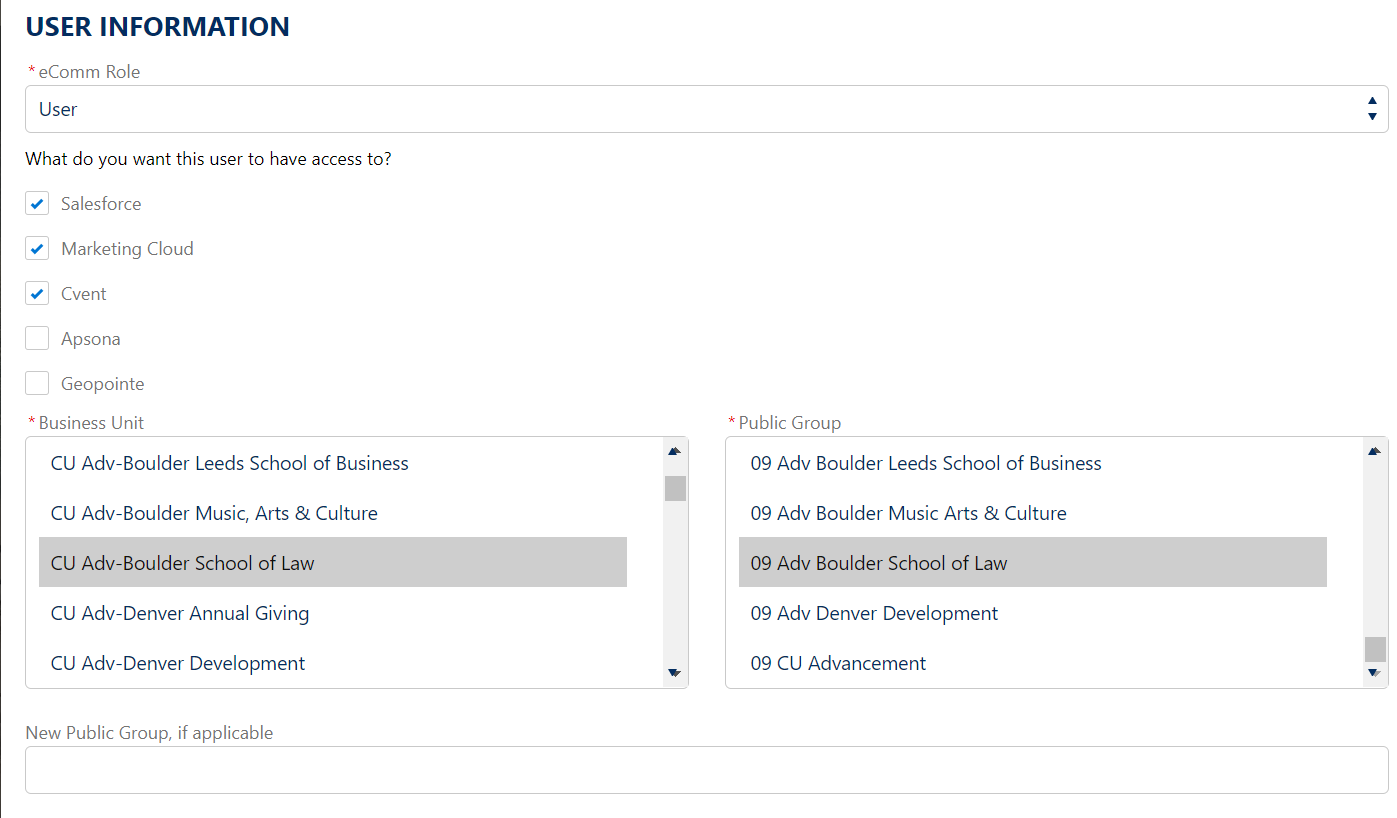
- Add user information, including:
- eComm Role
- What do you want this user to have access to?
- Business Unit
- Public Group
- New Public Group (if applicable)
- Select the Next button

Provide SkillSoft Course Screenshot
Do not forget to add SkillSoft screenshots to the license record.
- Open the License record (link is provided on the final provisioning screen or instructions below)
- Navigate to the Related tab
- Use the Upload Files button to attach SkillSoft course screenshots

Confirm Signed eComm Agreement
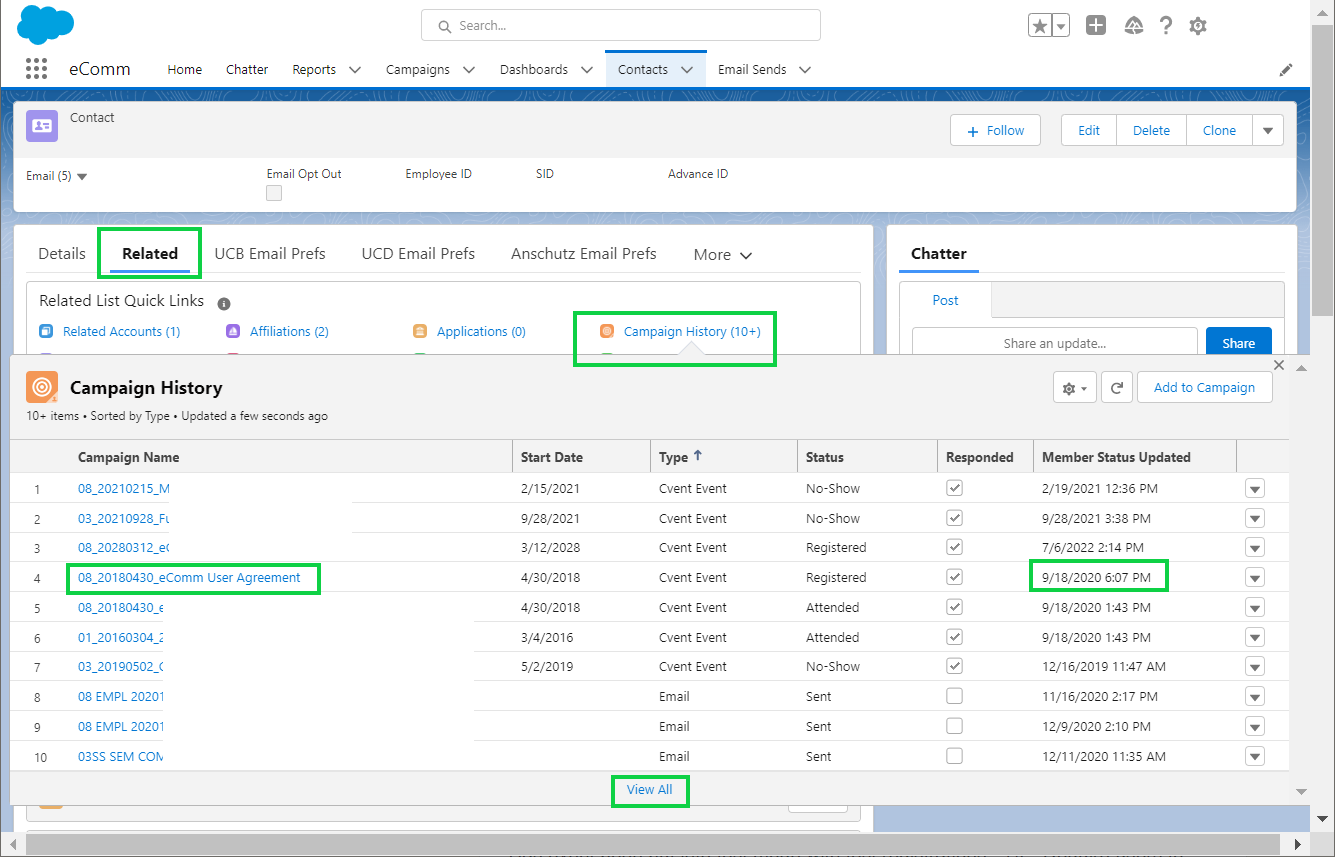
Want to confirm a new user signed the eComm agreement as part of pre-access requirements? View the Contact's Campaign History.
- Find a Contact. You can either:
- Search by name or email address in the top bar. Select the Contact's name

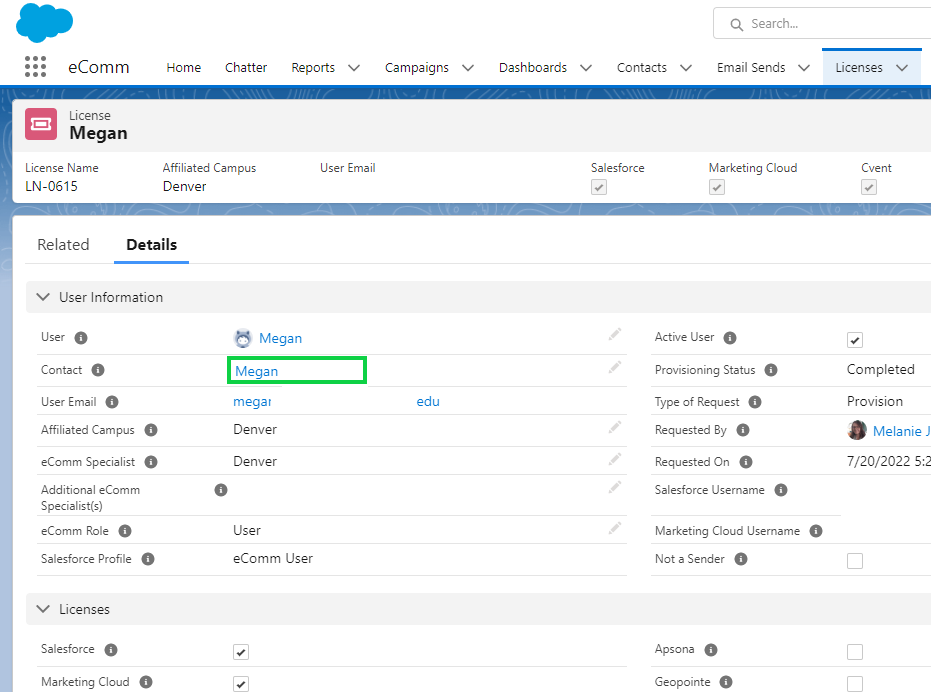
- Confirm it's the right Contact by checking the License record on the Related tab (instructions in next section)
- Select the Content name from the License record
- Navigate to the Related tab of the Contact
- Hover Campaign History to find the eComm User Agreement Campaign with the date/time signed
- You may need to View All to see this Campaign
What is 'Net New'?
When you request a license, you may be asked if it is 'net new'. This is important for billing purposes.
When the fiscal year (July 1) begins, document the number of licenses you have for each application. Any licenses that you request throughout the year that exceed these original counts are considered 'net new'. For example:
- If a licensed employee leaves and the new position is filled, you likely will submit a deprovisioning request and a provisioning request. Swapping a license like this will not be 'net new'.
- Suppose a group decides to no longer use eComm (resulting in one deprovisioning request) and a different group decides to start using eComm (resulting in one provisioning request). In that case, this license swap will not be 'net new'.
- If a new group decides to start using eComm or an existing group expands (resulting in provisioning requests), this will increase your original license counts and is 'net new'.
View License Details
View Individual License Record
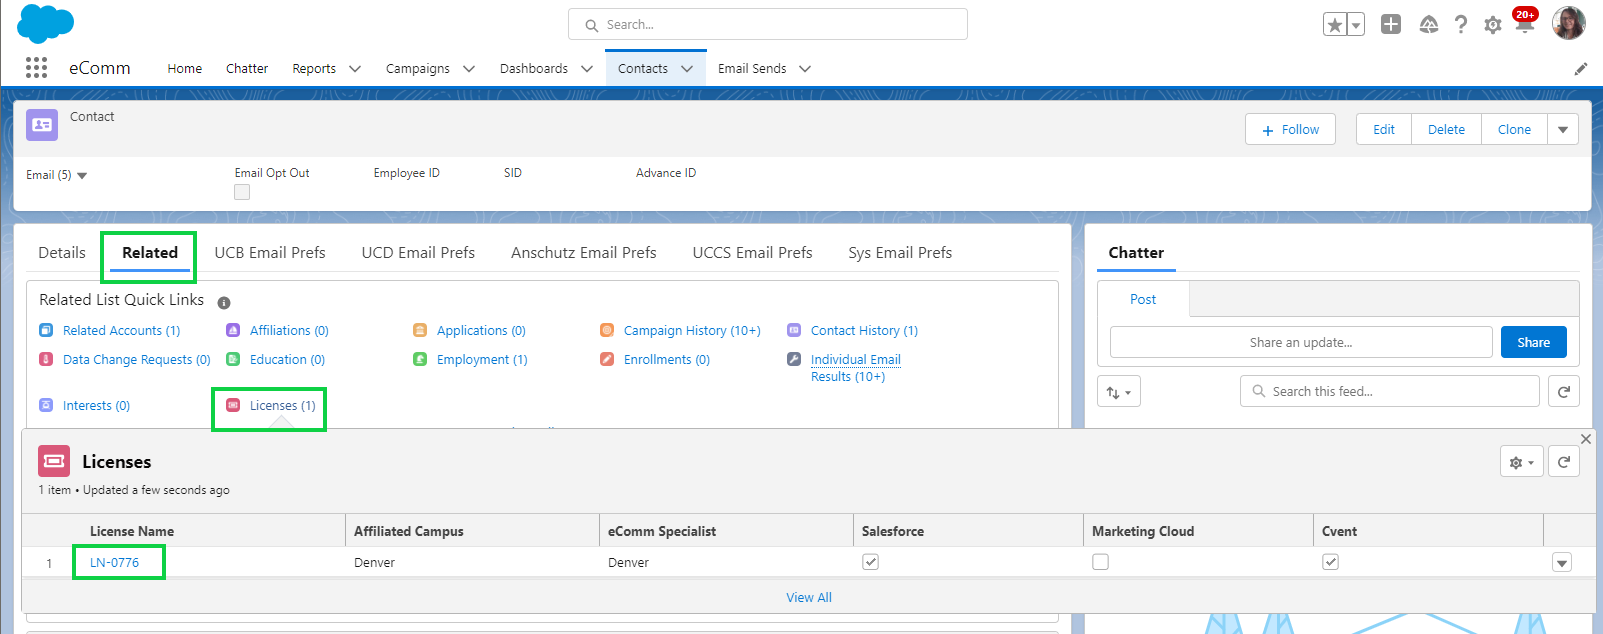
- After opening a Contact, navigate to the Related tab
- Hover Licenses and select the License Number to see the full License record
View Pending Requests
Checkboxes are not visible in Dashboard Lightning Table widget Checkbox Values are not displayed in the Lightning table widget in Dashboards since Winter '25. While this is a known issue currently in review, there is no resolution timeframe. Until then, please use the workaround outlined below.
To see checkboxes in a Dashboard table, you can view the same Dashboard in 'Analytics', and then proceed with the following instructions.
- Click the App Launcher (9 dots) in the top left.
- Search for Analytics by typing
- Click Analytics in the search options

- If you have recently looked at this Dashboard, it may show in Recents. If so, click the Dashboard named 08 ECOMM OG Monthly License Changes ALL
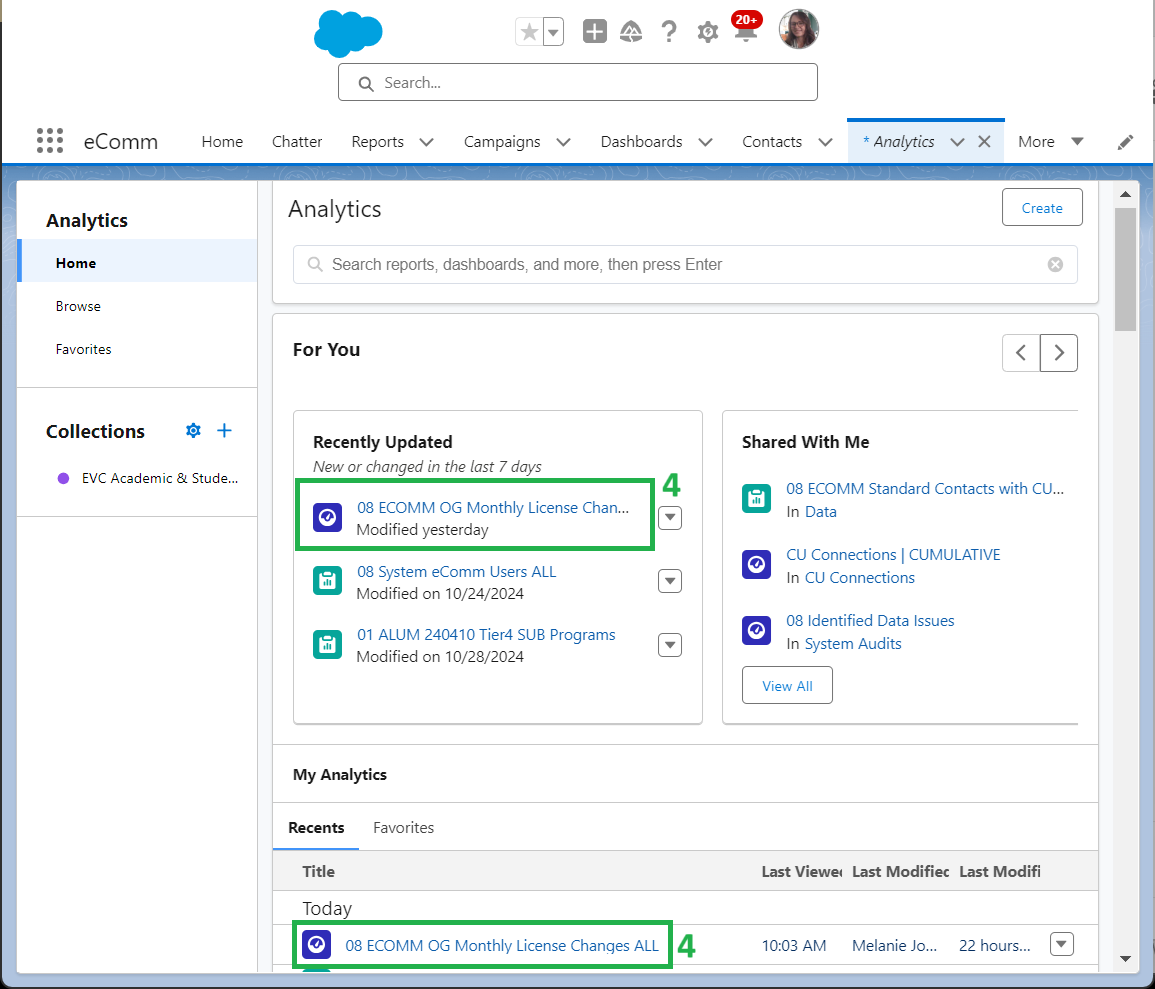
If not recently viewed:
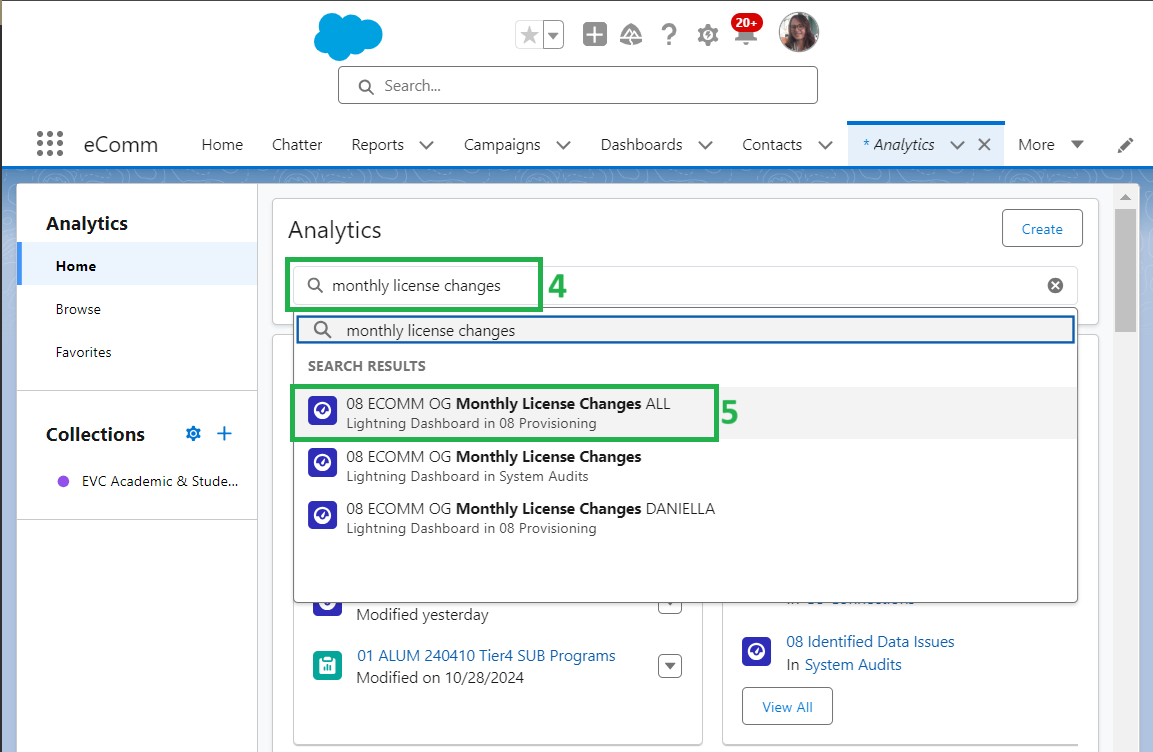
- Search for the Dashboard name
- Select the Dashboard in the dropdown list named 08 ECOMM OG Monthly License Changes ALL
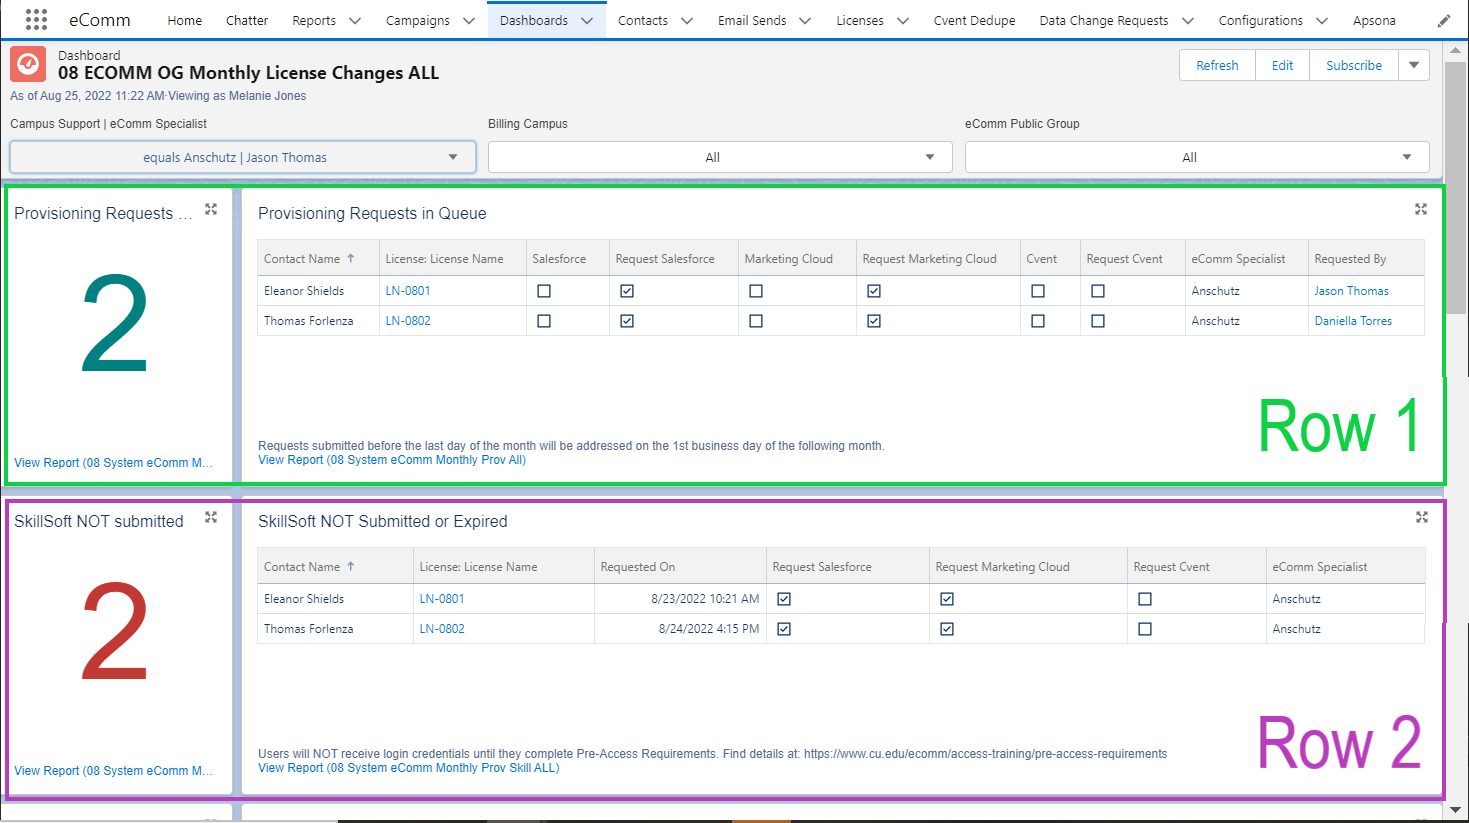
- Pending provisioning requests can be viewed on the first row of the license dashboard.
- The second row of the Dashboard indicates those without completed pre-access requirements who will be held until the following month.
- View details on the license or contact for which requirements are out-of-date.
View Existing Users
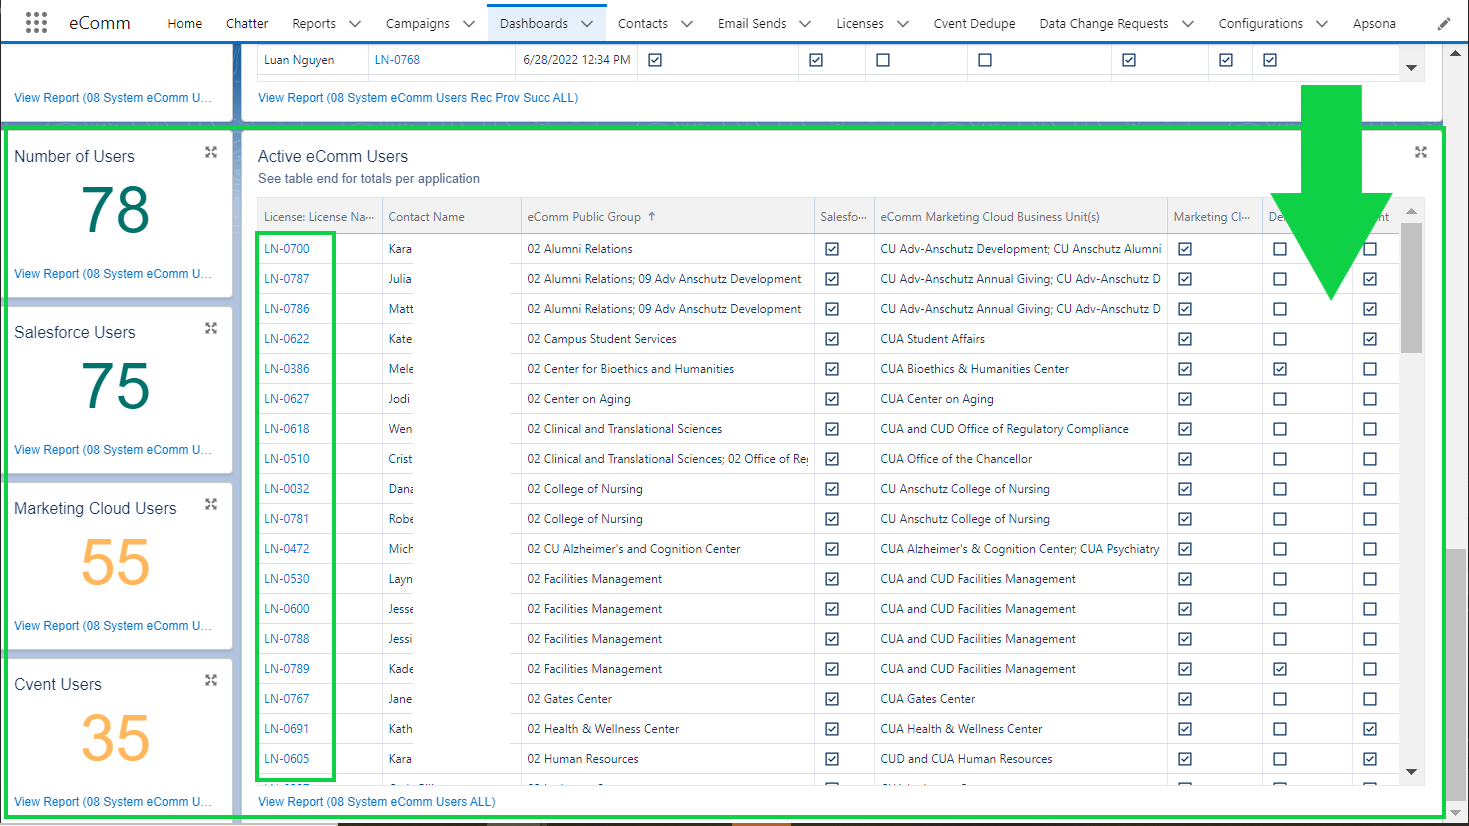
- To view a list of your active users, view the license Dashboard, scroll to the last row
- View active licenses and select the license number to see full details
Important Timing
Provisioning
Last Day of the Month
- Provisioning requests, along with completed pre-access requirements, MUST be provided by the last business day of the month in order to be addressed during the first week of the following month.
Around the 5th of the Month
- New users can anticipate credentials around the 5th of the month.
- eComm specialists will receive a monthly announcement in Chatter announcing an exact date to share with new users.
Deprovisioning
60 days after getting provisioned
- New users who fail to complete training and the quiz after 60 days will be deprovisioned (per the user agreement).
Six months after not logging in
- Users who do not log in for six months will be deprovisioned (per the user agreement).
New User Experience

Four Steps to Get Started with eComm for New Users
STEPS 1 & 2 | Discovery & Pre-Access Requirements
- eComm specialists should submit a provisioning request after meeting with a potential user for discovery, an important step to ensure eComm is the right fit. Pre-access requirements must be completed by the last business day of the month in order for provisioning to occur during the first week of the following month.
STEP 3 | Login Details, Training & Quiz
- The System team will notify new users when their credentials are ready (around the 5th of the month) with the eComm specialist CC-d. New users will also receive relevant training courses and a short post-training quiz, to be completed within the first month.
- Once new users complete the post-training quiz, they will be granted access to send Marketing Cloud emails and/or have Cvent events approved. They will be notified via email (with their specialist CC-d) and provided with continued training resources.
Users who do not complete the post-training quiz will be reminded to do so. If the quiz is not completed after 60 days of obtaining access, they will be deprovisioned.
Deprovisioning Requests
Don't have access? eComm specialists must review this following wiki and pass the quiz for access.
Submit Deprovisioning Requests

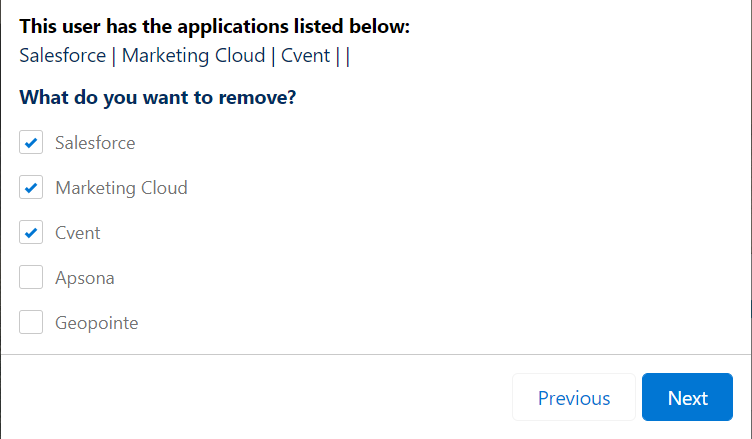
- Change the dropdown option to Deprovision

- Verify the tools in which the user is currently licensed so you know what to remove.
- Check the applications to remove and select Next
View Pending Deprovisioning Requests
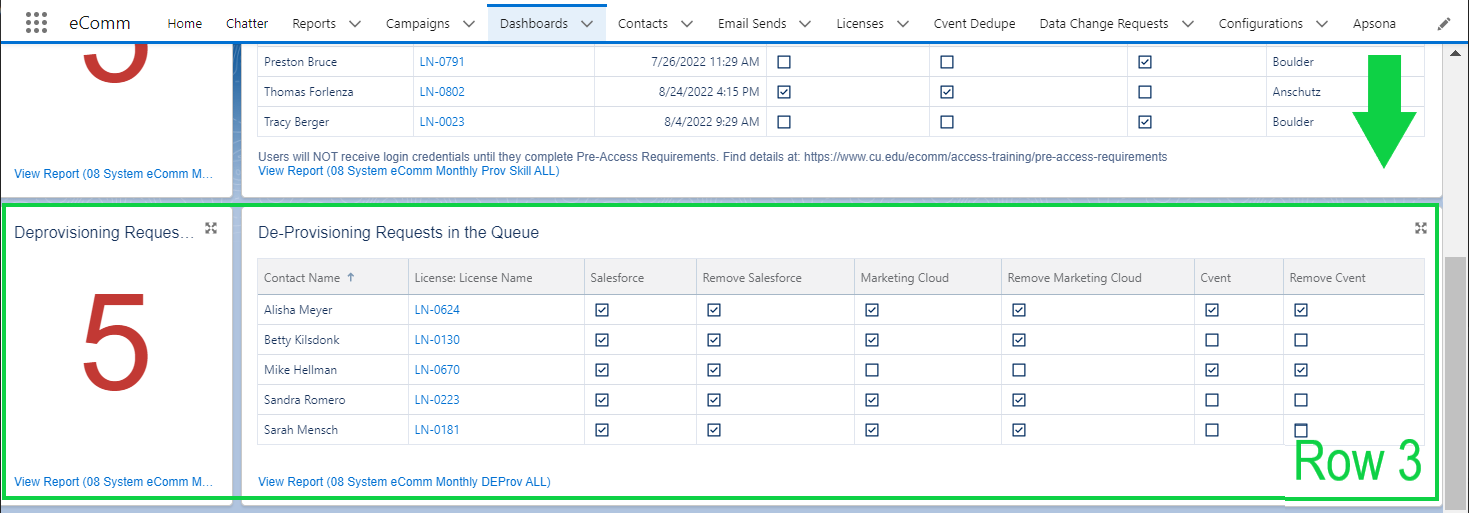
- Scroll to the 3rd row on the license dashboard to view deprovisioning requests that will be addressed during the first week of the following month.
Cvent Only Licenses
Chatter Free Users
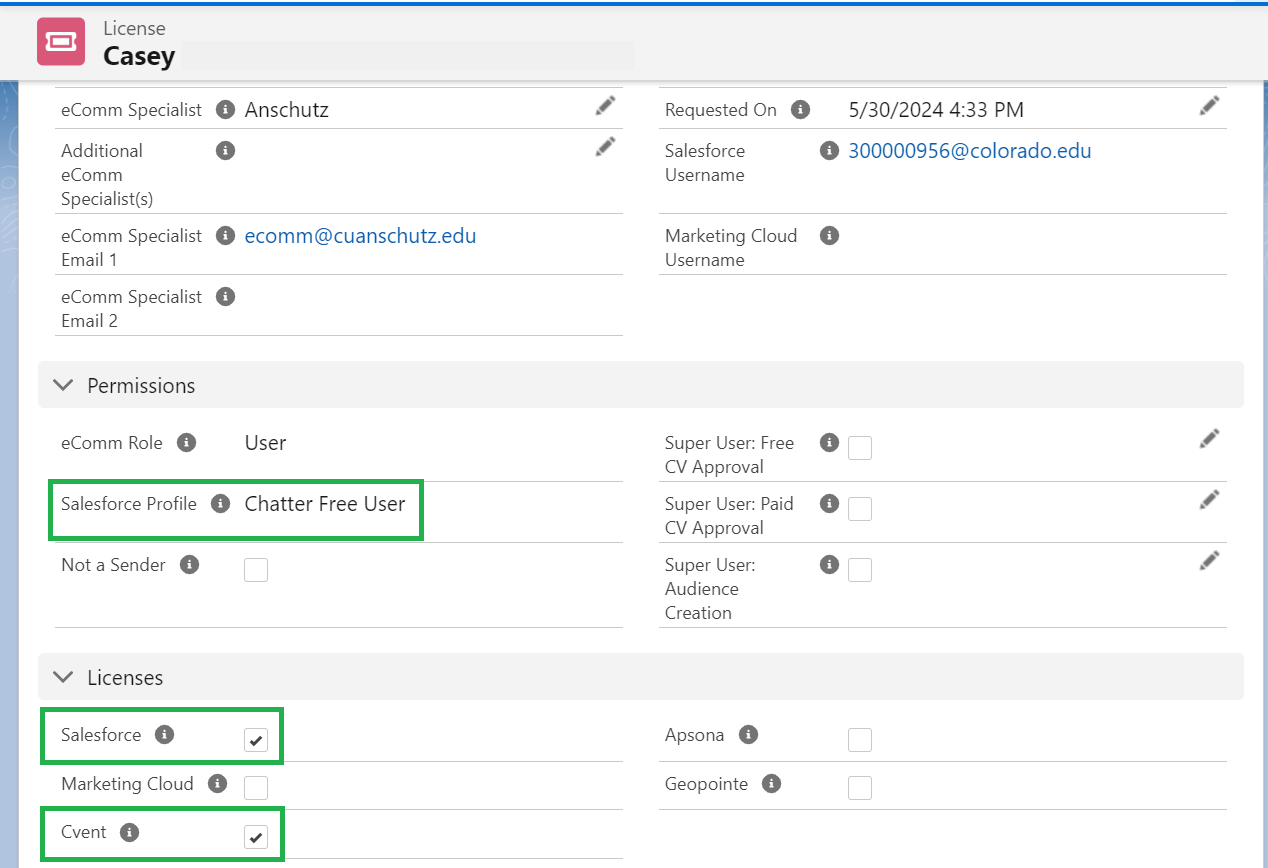
Many users have a license in Cvent ONLY - and thus only pay for Cvent. If you are looking at a user's license record and notice both Salesforce and Cvent are checked, also look under the 'Permissions' section to see if the 'Salesforce Profile' is 'Chatter Free User'. This means they are not paying for Salesforce access and instead have a 'Chatter Free User' in Salesforce which is free. This grants them access to the Collaborative Community in Salesforce devoted to Cvent. See the example below.
If a user wishes to see Dashboards in Salesforce (or anything more than participate in the Collaborative Community), they require a full Salesforce license.
License Changes Quiz for eComm specialists | REQUIRED FOR ACCESS
Related Content
- How do I view a contact?
- What is the difference between a Standard Contact and an Individual Contact?
- How do I modify information on a contact (such as the email address)?
- How do I add a contact to a Salesforce campaign?
- What are individual email results (IERs) and how can I use them?
- How do I add contacts to Salesforce?
- How can I match new contacts against existing contacts to avoid creating duplicates?
- How will I know if a contact received my email?
- How does a Salesforce contact relate to a Marketing Cloud Subscriber?
- Is Salesforce GDPR compliant?


